Kubernetes Nginx ingress setup for Strapi with x-forwarded headers

If you’re using Strapi and you’re trying to figure out how to setup Nginx Ingress for Kubernetes or you are trying to solve one of the following issues:
https://github.com/strapi/strapi/issues/3462
https://github.com/strapi/strapi/issues/2424

Here’s the ingress configuration, and your nginx ingress helm chart value you should be editing:

#1 Provide use-forwarded-headers in your helm chart’s controller config params

# values.yaml
controller:
  config:
    use-forwarded-headers: "true"

#2 My ingress config

apiVersion: extensions/v1beta1
kind: Ingress
metadata:
  annotations:
    nginx.ingress.kubernetes.io/use-regex: "true"
    nginx.ingress.kubernetes.io/proxy-body-size: 200m
    nginx.ingress.kubernetes.io/enable-cors: "true"
    nginx.ingress.kubernetes.io/cors-allow-origin: "*"
    nginx.ingress.kubernetes.io/cors-allow-headers: "*"
    nginx.ingress.kubernetes.io/cors-allow-credentials: "true"
    nginx.ingress.kubernetes.io/cors-allow-methods: "*"
    nginx.ingress.kubernetes.io/proxy-connect-timeout: "30s"
    nginx.ingress.kubernetes.io/proxy-read-timeout: "20s"
    nginx.ingress.kubernetes.io/client-body-buffer-size: "50m"
    kubernetes.io/ingress.class: nginx
  name: strapi-ingress
spec:
  rules:
  - host: mydomain.com
    http:
      paths:
      - path: /
        backend:
          serviceName: angular-ui
          servicePort: 80
      # Depends on the plugins you use
      - path: /(admin|plugins|email|settings-manager|documentation|content-type-builder|upload|users-permissions|users|content-manager|auth)/?.*$
        backend:
          serviceName: strapi
          servicePort: 1337

#3 Custom nginx ingress installation

You might want to create a custom configmap to us within your nginx ingress installation like the following:

apiVersion: v1
data:
  use-forwarded-headers: "true"
kind: ConfigMap
metadata:
  name: nginx-configuration

#4 Digital Ocean k8s

or if you are running your k8s in Digital Ocean you need to add few more config params, but I’d suggest you read this full blog post:

https://www.digitalocean.com/community/questions/how-to-set-up-nginx-ingress-for-load-balancers-with-proxy-protocol-support?answer=50313

#5 Nginx map directive

If you are simply using Nginx as a load balancer, you might want to setup the map directive outside your server block like the solution provided in this comment: https://github.com/strapi/strapi/issues/2424#issuecomment-445964719

CircleCI notifications in RocketChat

There is no official CircleCI integration for RocketChat, therefore this has to be done a little manually.

Below is an example of how I use it.

.circleci/config.yml

version: 2
jobs:
  build-development:
    docker:
      - image: debian:stretch
    steps:
        - checkout
        - run: 
            command: apt-get update && apt-get install -y curl
        - run:
            name: Greeting from hello
            command: echo "Hello, world from hello."
        - run:
            name: Notifiation Failed
            command: bash .circleci/notify "failed"
            when: on_fail
        - run:
            name: Notification Sucess
            command: bash ./circleci/notify "success"
            when: on_success
        
workflows:
  version: 2
  build-deploy:
    jobs:
      - build-development
          filters:
            branches:
              only:
                - develop

Note that on_fail will only execute if one of the above will fail, same with on_success, it only executes if all of the above are successful.

.circleci/notify


#!/bin/bash
set -euo pipefail

payload=$(
cat <<EOM
{
    "status": "$1",
    "job": "$CIRCLE_JOB",
    "build_num": "$CIRCLE_BUILD_NUM",
    "project_reponame": "$CIRCLE_PROJECT_REPONAME",
    "branch": "$CIRCLE_BRANCH",
    "build_url": "$CIRCLE_BUILD_URL",
    "compare_url": "$CIRCLE_COMPARE_URL",
    "sha1": "$CIRCLE_SHA1"
}
EOM
)

curl -X POST -H 'Content-Type: application/json' --data "$payload" https://YOUR-ROCKETCHAT/hooks/INCOMING-WEBHOOK-INTEGRATION-URL

RocketChat Incoming WebHook Integration

class Script {
  
  process_incoming_request({ request }) {
     
    var alertColor = "warning";
    
    let status = request.content.status;
    let job = request.content.job;
    let build_num = request.content.build_num;
    let project_reponame = request.content.project_reponame;
    let branch = request.content.branch;
    let build_url = request.content.build_url;
    let sha1 = request.content.sha1;
      
    if (status == "success") {
    	alertColor = "good";
    } else if (status == "failed") {
    	alertColor = "danger";
    }

    let textMessage = (status == "failed" ? "@all\n" : "");
        
    let title = status == "failed" ? " build failed!" : " was built successfully!"
    
    textMessage = textMessage + "*Build no*: " + build_num + "\n*Project*: " + project_reponame + "\n*Branch*: " + branch + "\n*Commit*: " + sha1

    return {
    	content: {
	    username: "CircleCI",
            attachments: [{
		text: textMessage,
                color: alertColor,
                title: job + title,
                title_link: build_url
            }]
        }
    };

    return {
    	error: {
        	success: false
        }
    };
  }
}

Upgrade postgresql 9.2 to 9.6 in CentOS 7 (bold steps)

==============
Install postgresql 9.6
==============

wget https://yum.postgresql.org/9.6/redhat/rhel-7.4-x86_64/pgdg-centos96-9.6-3.noarch.rpm
rpm -i pgdg-centos96-9.6-3.noarch.rpm

yum install postgresql96-server postgresql96-contrib
/usr/pgsql-9.6/bin/postgresql96-setup initdb

mv /usr/bin/pg_ctl{,-orig}
echo '#!/bin/bash' > /usr/bin/pg_ctl
echo '"$0"-orig "${@/unix_socket_directory/unix_socket_directories}"' >> /usr/bin/pg_ctl
chmod +x /usr/bin/pg_ctl

==============
Start importing/upgrading data to new server
==============

systemctl stop postgresql
# At this point both servers are stoped

# As Postgres user
su postgres
cd ~
/usr/pgsql-9.6/bin/pg_upgrade -v -b /usr/bin/ -B /usr/pgsql-9.6/bin/ -d /var/lib/pgsql/data/ -D /var/lib/pgsql/9.6/data/
exit

# Back to root user
# Rollback pg_ctl
mv -f /usr/bin/pg_ctl{-orig,}

#### APPLY OLD postgresql config params to postgresql-9.6 (pg_hba.conf, postgresql.conf) (manually), maybe use pgtune for postgresql.conf...

==============
START NEW SERVER AND DISABLE THE OLD
==============

systemctl start postgresql-9.6
systemctl enable postgresql-9.6
systemctl disable postgresql

# temporary
ln -s /usr/pgsql-9.6/bin/psql /usr/bin/psql --force
ln -s /usr/pgsql-9.6/bin/pg_dump /usr/bin/pg_dump --force

# Postgres user
su postgres
cd ~
./analyze_new_cluster.sh
exit

# back as root
# remove old postgresql
yum remove postgresql

# Export new path
echo 'export PATH=$PATH:/usr/pgsql-9.6/bin' >> /etc/bashrc

exit, SSH back to host and check if new path is ok for postgres commands

Finally decide if you want to remove the old postgres cluster (data folder)

MemcacheD php client for development purpose on Laravel 5

This class simulates the real Memcached PHP extension (which doesn’t exit) on windows (php_memcached.dll) – Note the “d”.
I forked and modified this repository so that it works with few basic methods of laravel 5… Please don’t use this class in production, use it only for development purposes.

Github repo: https://github.com/altinukshini/memcached-client

Configuration in Windows machine

Before you do anything else, make sure you have Memcached server installed. Here’s a blog that shows how to do that (follow step A): https://commaster.net/content/installing-memcached-windows

Assuming you have Memcached server installed, proceed with the following.

Place memcached.php file in C:\xampp\php\pear folder

In your laravel 5 installation, edit AppServiceProvider.php and place the code below inside the boot() method.

if (!class_exists('Memcached')) {
    include ("memcached.php");
}

so it should look something like:

public function boot(Kernel $kernel)
{
    if (!class_exists('Memcached')) {
        include ("memcached.php");
    }
}

…you should be good to go!

Building Hackerspace CRM

Hackerspace CRM (Community Relationship Management) is a web application built with Laravel that helps communities around the world to run and manage their Hackerspaces/Makerspaces.
Github: https://github.com/altinukshini/hackerspacecrm

My friends and I run Prishtina Hackerspace (a hackerspace in Kosovo), and since the beginning of it we always struggled finding the best solution to manage members, payments, keys, etc. I’m not trying to reinvent the wheel, we tried many different applications but I think we need a better solutions for this. I think that many hackerspaces face the same problem when dealing with 30+ members. I know all hackerspaces have different structures, but we could maybe boil down to something common and useful for all of us.

There are many open source CRM software out there like CiviCRM and such (paid ones as well) that actually do have more functionality in them but are hard to use because of their complexity.

Hackerspace CRM tends to be more user friendly and come to use only to Hackerspaces. The idea is to have most of the application parameters configurable via the administrator panel. The application should be modular so that other hackerspaces around the world can write their own specific functionalities. Anyone can write a theme for it or even localize the CRM for use in their own language.

Features

So far, I’ve thought of couple of features, most of which I liked in Seltzer CRM, and some that I thought might be useful based on my experience with Prishtina Hackerspace and some local hackerspaces in Balkans. But, in order for this CRM to be as good as it can (and obviously better than the existing solutions), I need your help to let me know what do you struggle with, and what would you need to have in such application? How do you process this kind of stuff, what services you use and what would be the easiest way to complete your hackerspace administrative tasks via this CRM. Continue reading “Building Hackerspace CRM”

Restrict RoundCube login username to one domain

Roundcube is a client software to access IMAP mailboxes. If you already came to this post, then I’m sure you’ve figured out that RoundCube does not restrict domains in the login form, which means that as long as your username and password are OK, you can basically use any domain you like in your username field. Exc: @gmail.com, @yahoo.com etc.

This is not something that Roundcube deals with, because it should be taken care of on your IMAP server configuration, and if the IMAP server does not check for your full username (domain included), and allows access with any other domain, you get access :). However, even if it’s taken care of on your IMAP server, handling this in RoundCube will prevent an unnecessary request to your IMAP server.

One of the configuration options in Roundcube helps you append the domain to a clean username login.
Exc: if in your username field you type only the username “username” without the “@domain.com” then roundcube can help  you by appending the “@domain.com”. This is helpful only for IMAP servers that require full e-mail addresses for login. You can specify this by editing $rcmail_config[‘username_domain’] variable in config/defaults.inc.php

By default that variable is blank as below:

$config['username_domain'] = '';

Above that variable, you’ll find a short description on what options can be set to this variable, one of which you might assume it is:

%d - domain (http hostname $_SERVER['HTTP_HOST'] without the first part)

But in cases when your roundcube installation is in a different host/domain server than your original domain that is needed to authenticate in your IMAP server, that will not help, therefore use your domain as follows:

$config['username_domain'] = 'yourdomain.com';

Now if you type “username” (without the domain) in the username field, roundcube will append “@yourdomain.com” and the request to your IMAP server will have your username sent as “username@yourdomain.com”, otherwise if you already specify the domain in your username field, it will make the login request with the specified domain which in this case can be anything (@gmail.com, @yahoo.com etc). Continue reading “Restrict RoundCube login username to one domain”

Track user last-login with Dovecot and MySQL in Postfix setup

This will help you to set up SQL based user last-login tracking.
Beware of potential SQL injection holes if you allow users to have special characters in usernames.

Create a MySQL table named “lastauth”

CREATE TABLE IF NOT EXISTS `lastauth` (
`user` char(32) NOT NULL,
`remote_ip` char(18) NOT NULL,
`timestamp` timestamp NOT NULL DEFAULT CURRENT_TIMESTAMP ON UPDATE CURRENT_TIMESTAMP,
PRIMARY KEY `user`
);

Create the bash script in /usr/bin/trackAuth.sh

#!/bin/bash

# $USER > login username 
# $IP > remote ip address 

MYSQL_USER='USERNAME'
PASSWD='PASSWORD'
DB_HOST='DBHOST'
DB_NAME='DNAME'


CHECK_USER=`mysql -h${DB_HOST} -u${MYSQL_USER} -p${PASSWD} ${DB_NAME} -AN -e "SELECT user from lastauth WHERE user='$USER' LIMIT 1"`

if [ $CHECK_USER == "$USER" ]; then

if [ X"${USER}" != X"dump-capability" ]; then
mysql -h${DB_HOST} -u${MYSQL_USER} -p${PASSWD} ${DB_NAME} >/dev/null 2>&1 <<EOF
UPDATE lastauth SET remote_ip="$IP", timestamp=NOW() WHERE user='$USER';
EOF
fi

else

if [ X"${USER}" != X"dump-capability" ]; then
mysql -h${DB_HOST} -u${MYSQL_USER} -p${PASSWD} ${DB_NAME} >/dev/null 2>&1 <<EOF
INSERT INTO lastauth (user, remote_ip, timestamp) VALUES("$USER", "$IP", NOW())
EOF
fi

fi

exec "$@"

Continue reading “Track user last-login with Dovecot and MySQL in Postfix setup”

Set up NRPE (v2.13) with xinetd in ubuntu server 14.04

Update softwar repo, install gcc, create temporary installation dirs, create nagios user, install xinetd, download and compile NRPE…

apt-get update ; apt-get install gcc -y ; mkdir /tmp/download ; useradd nagios -s /bin/false ; mkdir /usr/local/nagios ; chown nagios:nagios /usr/local/nagios ; cd /tmp/download ; apt-get install xinetd -y ; wget http://sourceforge.net/projects/nagios/files/nrpe-2.x/nrpe-2.13/nrpe-2.13.tar.gz ; wget http://www.nagios-plugins.org/download/nagios-plugins-2.1.1.tar.gz ; tar zxvf nrpe-2.13.tar.gz ; cd nrpe-2.13 ; ./configure --disable-ssl --with-nrpe-user=nagios --with-nrpe-group=nagios --with-nagios-user=nagios --with-nagios-group=nagios --libexecdir=/usr/local/nagios/libexec/ --bindir=/usr/local/nagios/bin/ --prefix=/usr/local/nagios ; make all ; make install-plugin ; make install-daemon ; make install-daemon-config ; make install-xinetd ; update-rc.d xinetd defaults

Edit /etc/xinetd.d/nrpe

nano -w /etc/xinetd.d/nrpe

add ip address of the monitoring nagios server

only_from = 127.0.0.1 <ip_address_of_monitoring_server>

Edit /etc/services

nano -w /etc/services

Make sure this line ‘nrpe 5666/tcp # NRPE‘ is on the file, or add it in the end, then save, exit and restart xinetd:

service xinetd restart
netstat -at | grep nrpe

Install nagios-plugins

cd ../ ; tar zxvf nagios-plugins-2.1.1.tar.gz ; cd nagios-plugins-2.1.1 ; ./configure --with-nagios-user=nagios --with-nagios-group=nagios ; make ; make install

Config file of NRPE (nrpe.cfg) is located in /usr/local/nagios/etc/nrpe.cfg
You can add different commands in there Continue reading “Set up NRPE (v2.13) with xinetd in ubuntu server 14.04”

HACCSY – Hackerspace Access Control and Check in System

HACCSY abbreviation stands for Hackerspace Access Control and Check in System and that’s pretty much what it does.

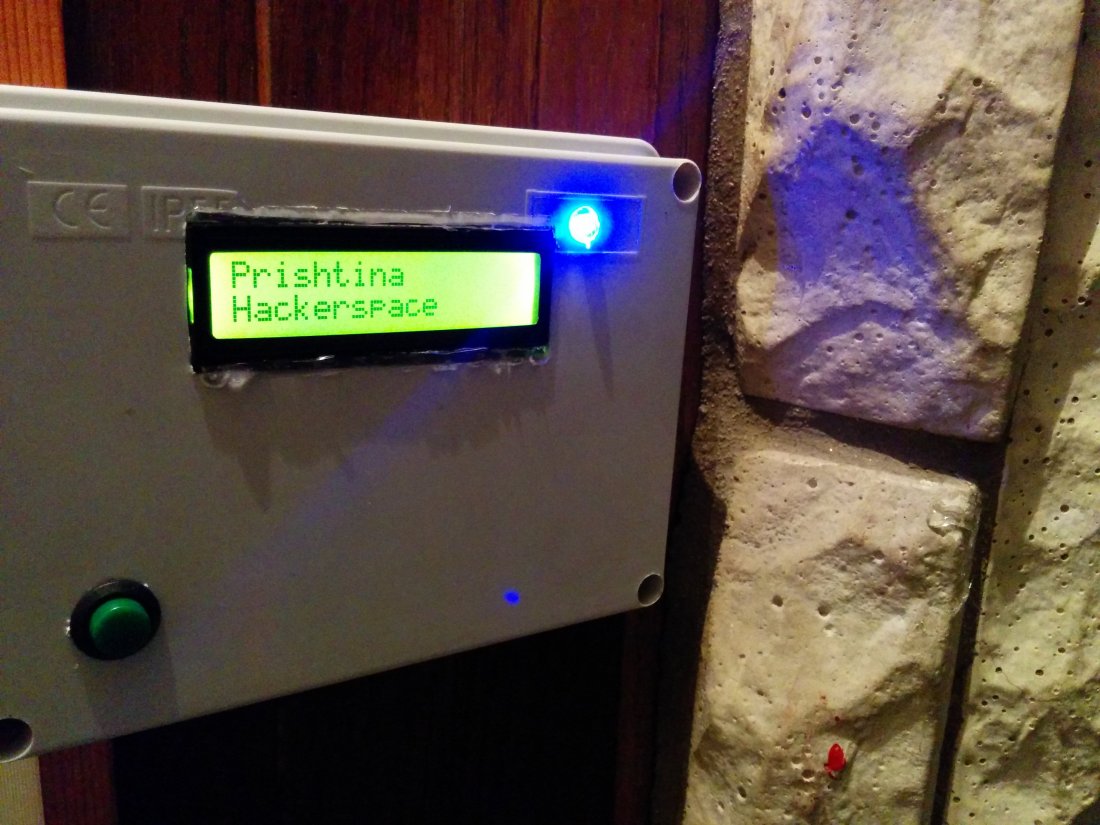
HACCSY app is meant to run on a RaspberryPi that’s connected to internet and the front door electric strike lock. It does the job of a simple Check in System and Door Access Control System (2 in 1), it queries a REST service by handing it the scanned in RFID card reader and it will return ‘true’ if the key owner owes less than 2 months worth of their monthly payment. It will return ‘false’ otherwise. It does the same for checking in and out. The computer would then send the signal to the door lock actuator to open it if returned true or do nothing if false. It has a check IN/OUT button to indicate Check IN or Check OUT. It also has an LCD backlight display that displays messages for the user, and an RGB LED that turns RED for Access Denied, GREEN for Access Granted and WHITE to indicate offline mode. Through the REST API, you can also make it available for others to see if the hackerspace is open or not. See working example on the website header at http://www.prishtinahackerspace.org

Code available on Github

HACCSY is built with the following hardware and electronic components: Continue reading “HACCSY – Hackerspace Access Control and Check in System”

Wiki Loves Monuments photo competition running for the second year in Albania and Kosova

Wiki Loves Monuments is an international photo contest for monuments running this September, organized by Wikimedia globally, as well as FLOSSK in Kosovo and Open Labs Albania.

Cultural heritage is an important part of the knowledge that Wikipedia collects and disseminates. Everybody can contribute images as well as write articles. An image is worth a thousand words, in all languages at once, and enthusiastic people can (re)discover the cultural, historic, and scientific significance of their neighborhoods by uploading photos to Wikimedia.

In 2012, Wikipedia volunteer communities in 35 countries joined this initiative. In 2014 nearly 40 countries all over the world are participating through national contests organized with their national monuments, partners, rules, events and winners. Continue reading “Wiki Loves Monuments photo competition running for the second year in Albania and Kosova”